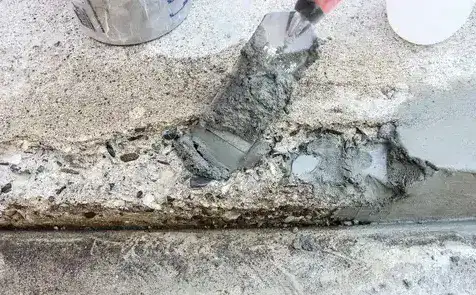
After the extreme winter season in the USA ends, it becomes necessary to repair concrete steps. Especially on your front porch or back patio, the concrete steps usually fall apart or chip off. Recovering them is important to maintain the safety of your buildings.
But, do you know how much it costs to repair concrete steps? Almost $250-$750 are expected to be spent on concrete step repair. So, what is your call? Isn’t it better to do it yourself to fix your concrete steps? With the help of this guide, you will get to know all the necessary steps to repair concrete steps on your own!
DO NOT RUIN YOUR REPAIR CONCRETE STEPS WITH UNINFORMED STRATEGIES, JUST FOLLOW OUR GUIDELINES TO SMOOTHLY REPAIR YOUR DAMAGED CONCRETE STEPS!
What materials do you need before planning Repair concrete steps?
To repair concrete steps, you need to buy various materials and stuff to make a mixture and a gadget to apply it to the steps. We have listed down all the necessary materials that you must have before starting repairing concrete steps:
- Chisel
- Hammer
- Industrial brush
- Shop vac
- Rag
- Concrete bonding adhesive
- Fast-setting concrete mix
- Rubber gloves
- Safety goggles
- Hoe
- Bucket
- Steel trowel
- Level
- Concrete edger
- Sponge
- Spray bottle with water
- Concrete sealer
Step-by-step process to repair concrete steps
Step#1 Removal of crumbled concrete
First, you need to remove any crumbled or cracked concrete so that the surface becomes smooth. You need to remove all the debris so that all the work is smoothly completed. Thrust the chisel into the crumbled concrete areas and then you have to place the hammer on the chisel’s top until everything is broken into pieces.
Step#2 Remove all the debris
The next step is to remove all the broken pieces of the concrete with the help of a strong brush. You have to make sure that all the little pieces of stone are swept away to clear the space. When you are done with removing the big pieces, you can use a vacuum to remove the dust from the area. After that, you have to spray the surface with water because by applying new concrete on the steps you have to make sure that the surface is wet.
Step#3 Apply bonding adhesive
Before starting this time, you have to make sure that you have a concrete bonding adhesive with yourself. It is necessary to connect the old concrete with the new one. Just like you use glue to stick one piece of paper to the other, the same way this adhesive is used to connect both of them. Make sure to apply it generously with a paintbrush or a rag in an even form. After applying it, wait for 2 to 3 hours so that it dries completely.
Step#4 Quick Dry Cement
Now the next step is to prepare concrete by following the correct way because it dries very quickly. So, when you are done with mixing concrete, you must be instantly ready to apply it so that it does not dry if you put it aside. You must take precautionary measures before mixing concrete such as using gloves and safety goggles. First, you have to mix the dry powder of the cement with your hands and then pour it into the concrete mix into a tub. Then you have to mix it with a hoe and add the remaining water from your bucket. Make sure that you do not exceed the water because it will not bond properly. The sign of a good concrete mixture is that it will look like wet mud and it will not crumble into your hands.
Step#5 Apply the cement quickly
At this stage, you will have to move faster and apply the cement to the crumbled area. This will help you stick your cement in the best possible way and cover the damaged areas with your gadget.
Step#6 Remove the excess concrete
Now, you have to remove excess concrete with the help of a concrete edger to smooth the surface. If you see any shallow part then use the travel and fill the gaps with the concrete mixture. Yet again, you have to smooth the surface with the help of a sponge. When you observe that the surface looks complete then use a level to confirm that it is flat.
Step#7 leave the concrete to dry
Did you know that concrete needs to be moist for 24 hours? Because the longer the material gets into the surface to dry, the finer the look will be at the end. So make sure that during this time, you keep wetting the surface again with the spray of the bottle.
NOW YOU CAN SUCCESSFULLY COMPLETE THE REPAIRING PROCESS OF THE DAMAGED CONCRETE BY DOING IT YOURSELF AND SAVE YOUR COST TO TAKE ANY PROFESSIONAL HELP!
Final Words
Hopefully, with the help of our guide, you can successfully complete the procedure to repair concrete steps. We have discussed all the insights so use the mixture on your old concrete steps to repair it. However, suppose you are a contractor and working on big construction projects. In that case, you can get help from professional concrete estimators because they will provide you with all the possible information about the expenses of materials and labour.

